Your Cart is Empty
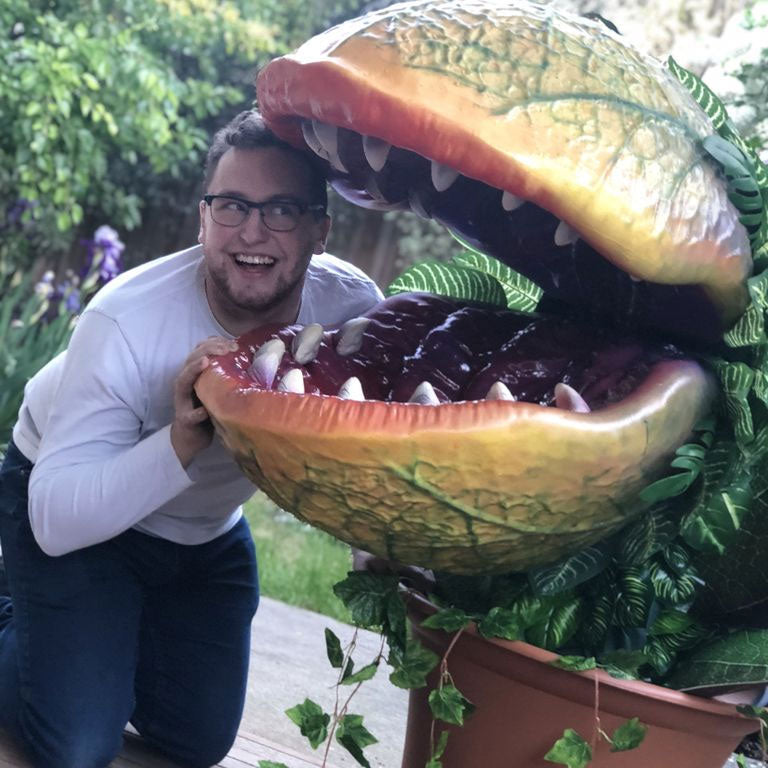
Every year in Melbourne, Australia, one of our team (Edward) tries to go bigger and better than the previous year's Halloween decorations. What follows is a write up he did on how he made this year's most incredible Audrey II puppet with the Formbot T-Rex 2+ 3D printer. Come check out the finished piece in our Melbourne Showroom today!
The following was originally published on Instructables and can be read here.
-----

This year the goal was to get some movement on a big prop, all the better to scare the kids with. When it came to deciding a theme, I felt there could be nothing more fun than the goofy 1986 horror comedy musical "Little Shop of Horrors", especially with a campy (yet slightly intimidating) man-eating plant.
With the idea chosen, and a required final date of Halloween 2018 set, we had some requirements in mind:
With these requirements all laid out, the plant was designed and constructed over a month of weekends. Being revealed on Halloween to a procession of 816 excited kids. While what was constructed in the end was a large and active Audrey II, I'll be going into detail of the methods I used and their pros and cons so you can apply them to any puppet you so require. I'll also be providing all the files in case you wish to make a large Audrey II of your own.
This puppet was made of several sections, all built at the same time and assembled at the end. For clarity, the steps will not be in chronological order, but rather detailing each method used.

The design tools used were:

There are many wonderful guides out there for learning how to use those tools, in better detail than here. I'm going to be working from the assumption that you have a basic understanding of how these work and how to use them.
Designing the mechanism:
When designing the plant mechanism, I had to consider all the requirements from the previous step, and how to best achieve them. Originally, the plant was going to be operated by a foot pedal at the base of the pot, around the back and out of site so that an operator could control the basic plant movement without being easily noticed. This was abandoned in favour of saving space and keeping everything as simple as possible.

As this plant was being made purely for a Halloween display, the movements were restricted to the pod opening and closing, and the plant moving backwards and forwards in the pod. Early on I figured we could combine these into one mechanism, operated by a simple pushing and pulling of a lever at the back of the main leaf, which could be very subtly moved by the hand of anyone walking past who so happened to choose to operate the plant at that second.

With the lower pod half attached to a pole that turned on a pivot, the top was attached to a parallel moving system, by changing the point of pivot for the back, the system was no longer parallel and pulled the top half of the pod up as it moved forward, creating a decent system that moved as desired while keeping the weight of the pod off the user.

The mechanism was spaced out in Blender using primitive shapes (cubes of various scales and dimensions), which were linked on a skeleton to test and get the movement just right. With the movement and basic shape of the mechanism nailed down, the sizes of the primitives were noted down, and a more polished design was drawn up in Illustrator for cutting out of wood.
Designing the pod:
With the early decision made to 3D print the pod in sections, it only made sense to design the pod on the computer. The program of choice ended up being Blender, as it was the program I was most comfortable using, and as it worked both as a decent sculpting program and not-entirely-the-worst mechanical design program.
Having never been the entirely most competent sculptor, the pod was a clever bit of sculpting cheating. The basic shapes of the two pod halves were modelled by the simple loop cutting of a cube (crtl + R) in editing mode, and moving the vertices around by hand until the desired shape was reached. The shape was then subdivided a lot of times until there was a large amount of geometry detail. With this done, displacement texture was mapped onto the pod, and using modifiers, the pod took on a really nice texture which could then be worked from.
The displacement texture was created in photoshop by taking interesting texture photos of plants, converting them to greyscale (knowing that whatever is lighter would protrude from the plant pod, and whatever was darker would cut into it), and overlaying them on each other until I was satisfied with the result. This is a lot of trial and error, but is incredibly good fun.

This displacement modelling is a great way of adding texture to 3D prints in a really similar way that you'd add a texture to a purely digital model.
Once the pod had some cool texture, extra details were added and removed in sculpt mode. This included the lips, some extra details on the inside of the mouth, and anything I felt would give the plant more personality. This can be used with the grab tool with a very large radius to help give the plant more of a random and interesting feeling. Using nudge on the outer texture can also give the plant a more organic feeling, helping take away from the clinical feeling you can sometimes get with displacement modelling.
Once you have all the detail you want added to the plant (or other modelling), it can sometimes leave you with a file that has more detail than is entirely reasonable. To clean up the mesh data and make it more manageable, under any tool in the sculpt tab, scroll down and select "Dyntopo" for dynamic topology. Under resolution, set the drop downs to "Subdivide Collapse" and "Constant Detail". Draw a few strokes on your model to find a value of resolution you like, as it changes model to model (for mine, I set it to 50). Then click the button "Detail Flood Fill". This will remesh your entire model to the detail level you set under resolution. I find this method gives a cleaner and more controllable results than the remesh modifier for cutting down on data while retaining most of the detail.
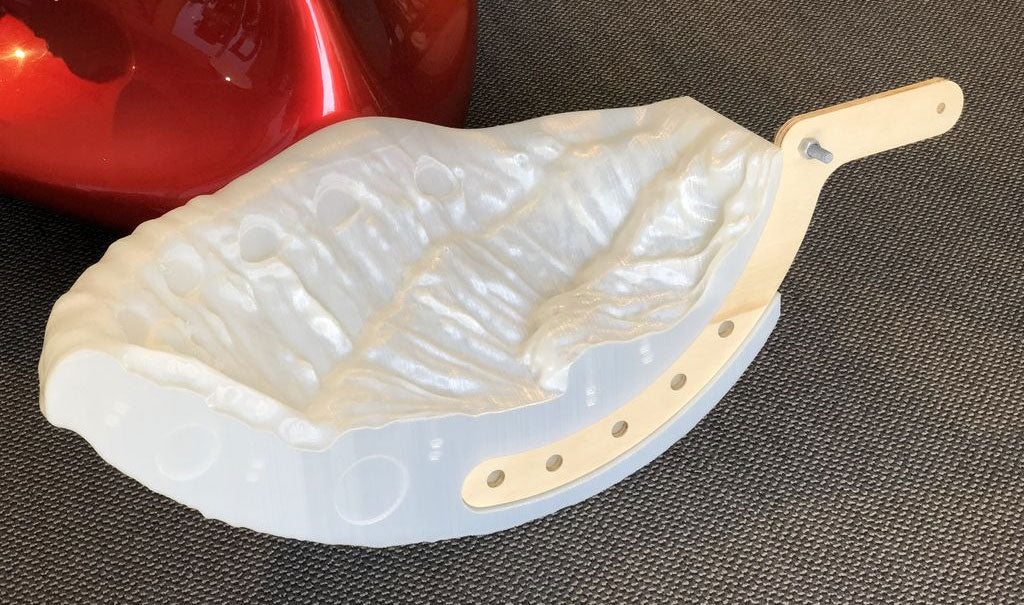
The final steps were taking the pod and splitting it up for printing in parts and the fitting of the mechanism, this was done by using the boolean modifier before exporting the STLs for printing.
Designing the leaves:
Knowing that I was planning to get the leaves printed up in 2D rather than 3D, they were drawn in photoshop by taking lots of different leaf textures and mix matching them until I had a look that I liked. Small crosses were added to help align the leaves when they were printed up, so that I could have them double sided without having to trim off much.

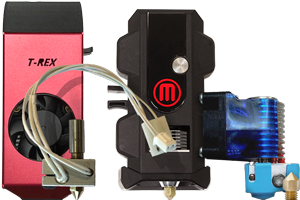
The plant was designed to print on and make use of the full scale of the Formbot T-Rex 2+ 3D printer. This was printed by friends of mine at the 3D Printer Superstore in Melbourne with the understanding that the plant would live with them after Halloween was over to help show off the printer in question.

For this, the pod was cut up into four main pieces, measuring around 400 x 400 x 700 mm in size (plus a tongue). The parts were sliced using Simplify3D, and printed in PLA. Originally, they were sliced to print at fairly normal settings, but each part was looking to take over a week of printing, and that was with absolutely no infill. So to save time, the parts were printed a 0.8mm nozzle, with two walls, and no infill. At these settings, each part took only about 1.2kg of filament to print, and a staggering 16 hours print time. Meaning we could print all the parts in under one working week. This also meant the parts were much stronger than if they'd been printed with a smaller nozzle.
An important part of 3D printing on this scale was ensuring that the part was strong without being too heavy to operate as a puppet. As such we used the (possibly never before used) method of designing the plant pod to be filled with a solid-setting expanding foam. With this in mind, the parts of the plant pods were designed to have holes between them so that when the foam set, there was areas bridging between the parts, minimising weak points. Parts of the wooden mechanism were also kept exposed to the foam, so that they would put less pressure on the 3D print, and help hold everything together as a second layer of adhesive.
This method can be used to add strength to any 3D print, as the 3D print can be sliced with less strength in mind and more aesthetics. The plant could have easily been printed with a 0.4mm nozzle and 0.025mm layer heights and been just as strong as the final product I made.
Things to keep in mind:
To print this particular plant, no supports were needed, but because I made use of a printer that had a bed that moved in the Y axis, I ended up placing some manually that attached to the bed just to give extra support as there was a decent chunk of mass moving fairly quickly.
Indents have been made in the plant, and each one has a different significance:
With the mechanism drawn up in illustrator, the mechanism could be cut out of 12mm PLY, carefully selected by being the cheapest available at the closest hardware store. The mechanism I put together was cut using a friend's x-carve, which was enjoyable in ensuring everything fit together perfectly, but not entirely required for a project this simple. The shapes are basic enough to cut out of wood using a jigsaw if you have a relatively steady hand, which is both cheaper and faster than the x-carve route(r).
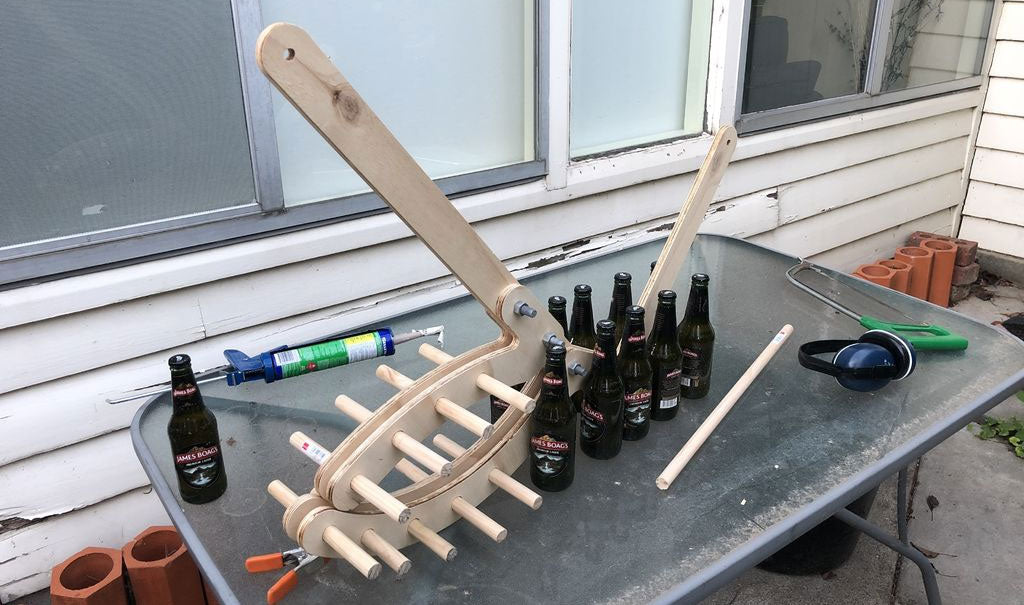
To cross brace the "jaws" of the mechanism, 19mm wide dowel was inserted in carefully sized holes (the equivalent which could be made with a drill and a 19mm hole drilling bit). These dowels both worked to brace the mechanism, but also penetrated deep into the empty space of the 3D prints, so when it was filled with expanding foam, the mechanism was braced with foam, rather than foam bracing the print, which braced the mechanism, making the whole system a lot more solid.
The moving pieces were joined with large bolts, with washers set between the moving wooden pieces to lower wear and stop the wood rubbing together. As most of the weight in the plant was carefully balanced during design, the mechanism would hold whatever position it had been left in, and the only 'tuning' was tightening or loosening the bolts to make the mechanism easier/more difficult to move.

Not included in the original design was several large weights to hold the plant in place. The plant didn't need them, but I quickly discovered it could be bowled over by a high velocity child, and decided that caution was the better part of valour. The extensions were quickly bolted into place, but the uploaded files have been updated to include them.

To assemble the mechanism, simply cut all the pieces out of wood using your preferred method. To correctly space out the "jaws" for gluing in the dowels, bolt them onto the two arms of the mechanism, with washers in between any parts that move. Cut the dowels to a length of 200mm each and glue into place using your preferred brand of wood glue, and carefully stand to dry. If an appropriate drying method isn't available, I discovered that several bottles of beer that no one wants to drink will work well in holding everything in place.

Take the two sides of the base, screw and glue the triangles onto them to give added support to the base. Once dried, take the two side pieces of the base and bolt them onto the mechanism arms with washers in place to space them out. Screw and glue the base of the mechanism on and set to dry. Finally, glue 150mm lengths of the 19mm dowel onto the base to act as weight locators. To weigh down the plant, we used the cheapest set of exercise weights we got from a local everything store.

When finishing and painting a prop on this scale, there's a few things to consider:
As a Halloween display, that was going to be seen up close, under a cover, on the cheap, with time not being something I was overly blessed with, the goal was to get something realistic in feeling (or at least menacing) with as much detail as I could cram in, painted in enamels I already had lying around, and as fast as possible!
Finishing:
There are two main methods of finishing 3D prints I've favoured in the past:

Neither were appropriate for this project, so the choice was made to cover the pod with XTC 3D, a two part resin that is designed to be painted onto 3D prints to give a smoother surface. With previous work I've found that it tends to hide smaller details and takes on a lumpy/gross appearance. While it can be sanded back more easily than pure PLA, it's more expensive and less effective than just hitting your print with an orbital sander or spray putty. But in the case of wanting a lumpy and gross looking pod, with minimal small detail, that could be covered in one 20 minute session, XTC was about as perfect a choice as you could get.
The first step in finishing any large (or small) piece like this is to ensure that all holes or problems have been filled/sanded away. In the case of the pod, the join had to be filled, and small cracks made by errant foam needed to be filled in to hide. For 3D printed parts, you need to use a plastic filler, not a wood or silicone one. Wood ones tend to crack as they're very stiff, and silicone ones tend to remain rubbery forever, neither being appropriate to 3D prints. Plastic filler tends to be more expensive, being a two part putty, but it's what you need.
Once that's done, the entire piece needs to be wiped down with a damp cloth to remove any dust or dirt, then left to dry before finishing. If you're sanding a big piece with an orbital sander, you don't really need to wipe down the piece with a damp cloth, it's just a good habit to have.

For those at home making the plant, you'll want to stand the two pod halves up, holding them in place with clamps. Ensure you're working in a well ventilated area and wearing the proper safety equipment, and mix up your XTC 3D. I'd recommend using a pigment to tint the XTC, as it'll help you keep a track of any areas you might have missed during application. For this step, calling in a friend can really help you get more done quickly, my friend with the pink fluffy hair was indispensable on this day of the build. Once the XTC is applied, you can choose to sand it back, or in the case of wanting weird blobbiness, I left it as it was.
Painting:

To paint this gummy fellow, the name of the game was speed. All the painting was done in a warm afternoon, which shows exactly what you can do when you wait the barest minimum acceptable time between paint layers and pray to whichever god you fancy. In the cause of spending as little money as possible, the paints used to paint the pod were all old cans of cheap spray paint I had left over from other projects. The main colours used were:

A step that can't be skipped or cheated is a plastic primer, to ensure your paint adheres properly. There could be no worse feeling than building a giant prop, only to have paint flake off at the very end. A thin layer of plastic primer ate nicely into the XTC giving me a great base to build up from.

The trick to good painting is good layering and a willingness to experiment. Choose the strongest colour(s) on your prop, and lay it down as carefully and nicely as you can. Everything can build up a bit more rushed, but having a good base is paramount. For the plant, instead of green, I decided a yellow exterior would be nice and bold looking with some good contrast with the leaves that would be surrounding it, a decision I was happy to emulate from Lyle Conway (google him, he's great). For the inside of the pod, you can't make a mistake with bright and bloody red. The pod was assembled on the mechanism for painting to ensure we could see what it all looked like when together, and more importantly, make sure the top and bottom pod matched.

Next was layering, I focused on giving the outer pod different shades of green and orange, layered on very lightly, and often over each other, occasionally laying on more yellow until I was happy with the effect. This involved a lot of experimenting with texture, with some colours fading evenly between each other (green to yellow), and some streaking and random (reds and oranges). For the interior of the pod, I darkened and dirtied up some areas with browns, and made some highlights with the purple applied incredibly lightly towards the front, and much heavier at the back. The purple made its way to the outside of the pod around the back, to tie together the interior and exterior and give it a more organic feeling. A few more layers of red and brown on the inside gave a great fleshy vibe.

All the spray paints I used were satin finished, which was great for the exterior of the pod, but for the interior I wanted a wet shiny look, so I sprayed quite a few liberal applications of gloss clear coat. This helped give the interior a surprisingly intimidating look. Once the teeth were in, I did some more applications of the clear coat to make everything look like there was a huge build up of saliva.

An important part of these projects is to learn and have fun, so for doing the details on the exterior, my fluffy friend got some lessons in different styles of painting, and how to fade, with the veins going from rich and dark at the back of the pod to light and eventually stopping at the front. Calling back to being happy to experiment, both of us made a few mistakes when doing the veins, but the errors were quickly covered up with more yellows and greens to give us a new fresh canvas to paint on. The only detailing done to the interior of the pod was darkening some of the crevices, mostly on the lips to give it a big soft look, as these were the part of the plant that had the most personality.
The pod was left to dry for a full 24 hours before being moved and worked on inside.
There were two types of leaves used on this project, homemade and store bought! When creating the plant, I knew I needed some large leaves to frame the body and give it more presence, along with a whole host of different small leaves surrounding and decorating every spare surface I had to hand.
For the big leaves, I wasn't able to track down and purchasable fake leaves to the correct size. When it came to the little leaves, I knew I wouldn't be able to make nearly the amount needed in the required time and get the rest of the plant finished (not to mention, preserving any remaining semblance of sanity). $50 and one of the most enjoyable afternoons spent on Aliexpress ensured that I had thousands of leaves making their way to my house to decorate the plant.
For the big leaves, there were a few considered methods, all of which would have worked well for the final product:
So I did the last one. Or rather, a friend did me a very nice favour and printed the leaf textures onto a stretchy sticker like material that is often used to wallpaper large photos onto walls. The texture was flipped on the long side so that two printed leaves could be stuck to each other, making one double sided leaf. To help post them and give them shape, I took chicken wire and cut it into the basic shape of the leaves, before sticking the two leaf halves together with the chicken wire sandwiched in the middle. Invisible to the casual observer, but they held together beautifully and could be posed as needed.

For those building the plant, and if I were to do it again without the help of this very kind friend, I would sew the shape of the leaf, put a thin layer of foam/stuffing inside, and sew over it to give the leaves shape and texture. With some thick armature wire carefully inserted, the leaf would still be very light and poseable. It could then be painted with thinned fabric paints and air compressors to match the level of detail on the pod, tying the two together.
To stick the small leaves everywhere, they were hot glued into place. A low temperature hot glue gun was used to great effect to stick leaves wherever there was a join or area needing detail to spruce up the plant and give it a bit of life. Hot glue has the amazing ability to dry semi-immediately, and bond the plastic of the leaves to the painted pod and the fabric of the stem.
On the pod, the small leaves were glued in a ring towards the back of the pod, then over the edge of the top of the stem to hide the seam between the two pieces, while still allowing the pieces to easily come apart for moving the prop in a small Suzuki. On the stem, the leaves were glued into the small/pleated areas of the stem, so they would stick out over the bulbous areas of the stem and give a lively appearance, effectively hiding all the fabric but building on its shape as a base.
Extra leaves were places around the small area were the horizontal part of the mechanism could be seen, mimicking the shape of the small withering leaves at the back of a recently bloomed flower. With the front half of the mechanism inside the fabric stem, and the back half of the mechanism behind the largest of the leaves, the entire mechanism was effectively hidden from public eye, and painted green to not draw attention to itself.
Very little was done to finish up the plant, as most areas of concern were covered up by the heavy application of leaves. But lots of small areas had splotches of acrylic paints to tie in troubled joints.
The teeth were printed very late in the game, and very quickly painted up with a mixture of layered brows, reds, and creams to give them a gross appearance before being glued into place and blended in with some hand painted reds/browns.

Vines were hung out the front of the pot, making it look a lot more like a plant, which was an incredibly late edition.
The pot itself was a cheap plastic pot picked up at a local hardware store, with a slice cut out of the back so it could just be sat into place once the plant was assembled. Into this pot, a wooden ring was glue, on which two giant leaves were attached, and many small leaves were glued into place to hide the mechanism and stem which attached via velcro.

All that was left was to eat candy!
Oh boy that was fun!
With a decent bit of experimentation, I ended up with a great big puppet that was able to terrorise a lot of small children on Halloween, being refilled with candy quite a lot (with friends shouting "Offering to the plant!" and chucking extra candy in the mouth every time there was a break between hordes of children).

Important lessons learned:

Let me know any questions you have in the comments and I'll be happy to help out as best as I can.
Happy printing!